Today we have some exciting and important changes for you! We recommend reading this so you know what to expect when you see the new version.
The main changes you will see are:
- Summary View of the Vehicle Condition Report
- You can now record and view videos with sound
- We will be able to notify you of software changes and other important news.
Service Advisor:
1. First, you will see that we changed “Presentation” to “Report” on your dashboard. That’s because it’s all about the Vehicle Condition Report that you will be sending to your customers.
 2. Summary View
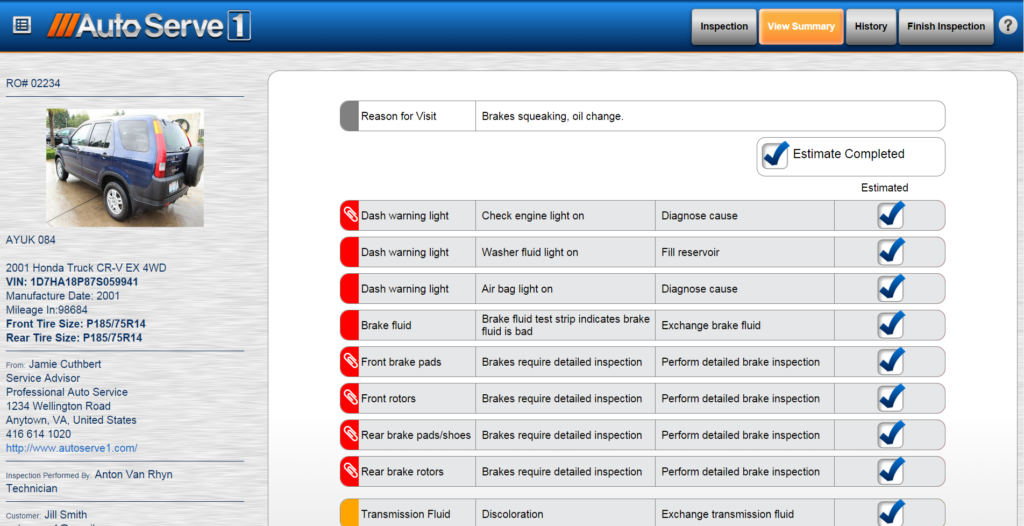
If you click on the Report button the first thing you are going to see is a Summary View of the Report. We know that many of you want to prepare an estimate before sending the report (you don’t have to do it in this order – see below) so that’s why we are showing you the summary first:
 Just want to prepare or send the Report? There’s a button for that!
Click the Prepare Report, Preview Report, or Send Report button at the top – that will take you directly to the screens you are already familiar with, and you can go ahead and prepare and send the report, there are no changes compared to how you have been doing that.
 How the Summary View helps you prepare an estimate:
If you are using the inspection results to help you prepare an estimate, the Summary View will make that a lot easier. We know you get interrupted all the time so we have even included a checklist so you can check off the items you have estimated, to help you remember when you come back to it.
A Summary View has all the information that will be included in the Report but it’s designed to make it a lot easier for you as the Service Advisor to easily review what was found on the vehicle.
TIP – If you see a paper clip on the row, than means there is more information – just click on the row and it will expand to show you photos, measurements, notes, etc. Click again to hide the extra information.
Watch this ‘Summary View’ video as a visual reference:
How the Summary View helps you communicate with the Technician:
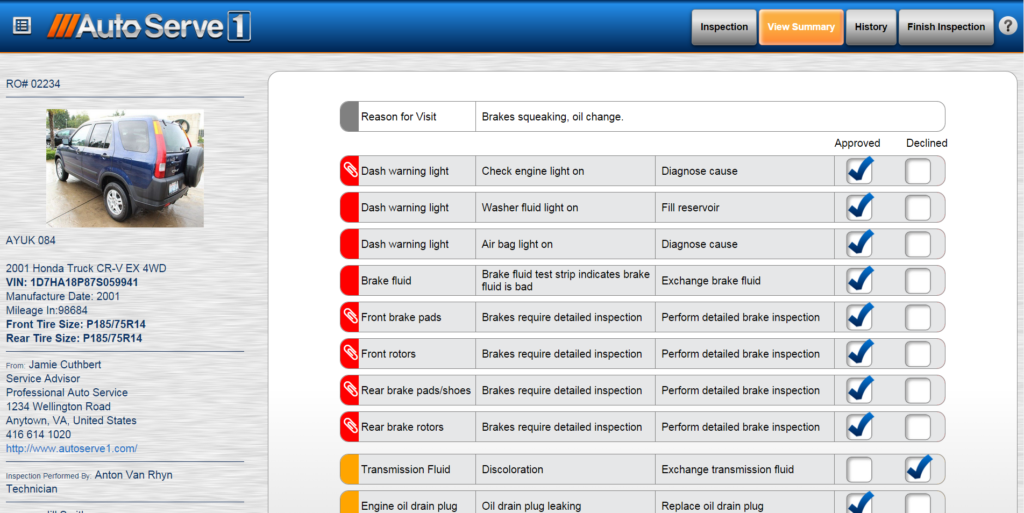
Once you have checked the “Estimate Completed” checkbox, the Summary View will show a different checklist – this time with Approved / Declined check boxes. Now when you are talking to your customer about the work required, you can mark Approved or Declined for each. What really great about this is when the technician clicks on the ticket on his tablet he is going to see the same Summary View, with the same checklist. So he will know exactly what needs to be worked on.
TIP: if you click “Estimate Completed” you are going to be sent directly to the Prepare Report screen. If you want to see the list of Approved / Declined checkboxes, just click View Summary (at the top of the screen) again.
 Service Advisor and Technician:
1. Notifications
You have probably already seen the bell with the notice beside it telling you about the new software we released:
 If you click in the bubble you will be taken to the blog posting on our website with these notes. Once you click on the bubble you won’t see it again until the next important notice we have for you.
Not all notices will display the bubble. Non-urgent notices will just show you the red bell with a number. You can click on the bell to read your unread notices:
 The bell turns white when you have read all notices. Once they are read, we recommend you archive them (use the trash can, or click Archive all).
 Watch this ‘Notifications’ video as a visual reference:
https://vimeo.com/119392524
Technician:
1. Videos!
We are very excited to announce that you are now able to record videos with sound and include them in the report. They work almost exactly the same way as photos.
On the inspection, click the camera icon:
 It will show you the usual options – you can select the Camera or the Video option. What’s new is that now the Video option works! Go ahead and record up to 15 seconds of video and sound.
TIP 1: Make sure you check the settings on your video camera and set the video size to the lowest size, (the exact setting will depend on your tablet). These videos have to go back and forth on the web, you do not want to be waiting all day for them to upload. Even at the smallest size, be prepared for them to take many seconds for them to upload.
TIP 2: Don’t overdo it with videos – as we have said, they take a while to upload, but they also take time for your Service Advisor and your customers to download and watch. So use them wisely!
Once you shoot the video, you can review it and click Save. If you don’t like it, select Cancel and redo it. Otherwise, select Done at the top right and it will be sent up to the AutoServe1 servers, ready for your customer to enjoy.
Watch this ‘Tech Videos’ video as a visual reference:
2. Summary View
As a technician, once you select Finish Inspection for a vehicle, the next time you click on the vehicle in your list, you are going to see the Summary View. That’s so you can quickly remind yourself of what you found on the vehicle. If the Service Advisor selects the Approved / Declined check boxes, you can also see which items were approved by the customer, right on your tablet.
Want to see the Inspection again, after you clicked Finished? There’s a button for that!
Click the Inspection button at the top of the screen – you can go back in to the inspection and make changes if necessary:
 Create a ticket within AutoServe1:
Create a ticket right within your tablet or computer by simply clicking on the help button at the top right corner, then selecting the create a ticket button. Be sure to include your contact information in the tickets description as well as the problem you’re experiencing.
